


News from Coop Bénimellal-KHénifra
12 Unique Ways to Use Paper Strips on Scrapbook Layouts – Scrap Booking

12 Unique Ways to Use Paper Strips on Scrapbook Layouts
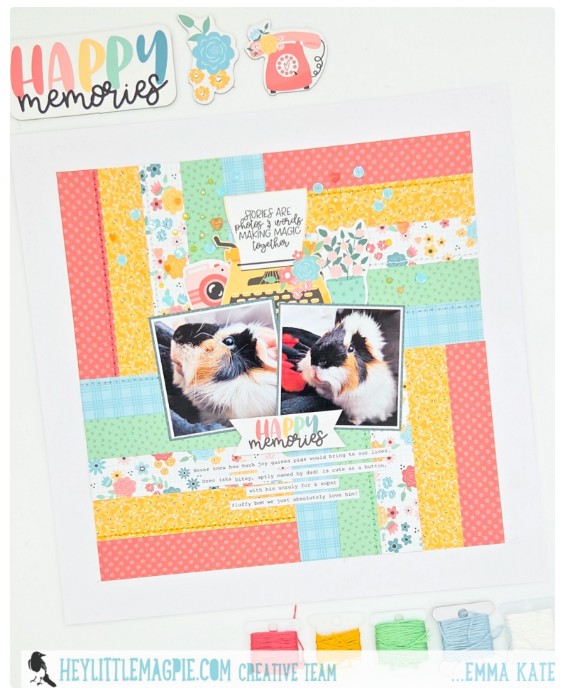
Emma used pretty pattern papers that have petite prints to create a beautiful background. She made blocks of strips in each corner, turn each one to make a quilt like design and she even stitched some of the strips in coordinating threads too. This is a great way to use shorter strips! Learn more at the Hey Little Magpie blog.
I’m guessing from the very beginning of scrapbooking they wondered what to do with all the extra strips of cardstock and pattern paper constantly being trimmed away. They’re too pretty to throw them in the trash so scrappers created fun and interesting ways to use them instead of toss them and we’re still doing it today. Hang on to those long pieces of lovely paper or trim up some new ones and use them for backgrounds and accents on your designs and today we’ll take a look at some unique ways to incorporate them.
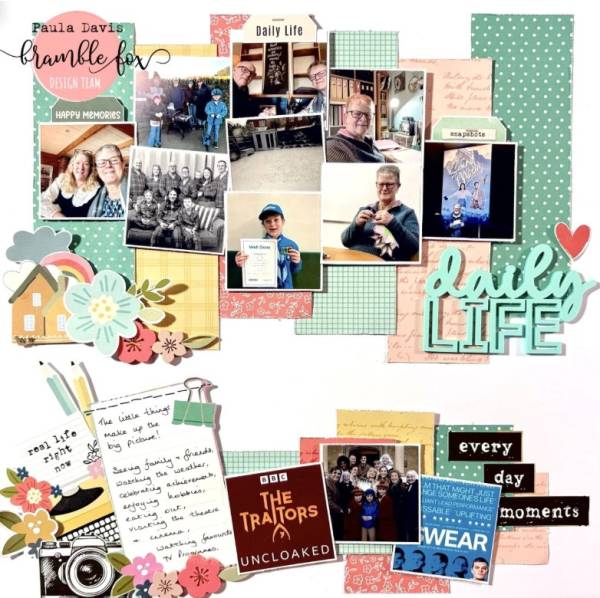
Paula used wide strips of pattern papers to create two rows, one longer than the other to sit behind all of her photos and embellishments. It’s a cool way to create borders and break up the design. Notice how she distressed their edges too. I love the thick teal acrylic words she used for her title and acrylic flowers she clustered, this adds great dimension. Take a closer look at the Bramble Fox blog.
Traci added dimension by curling the edges of the strips of paper on her page. Notice that they are double sided pattern papers so that adds even more pattern and color. She also did some tearing for texture too. Visit her blog to find a list of her 10 favorite ways to use strips on layouts at the Traci Reed Designs blog.

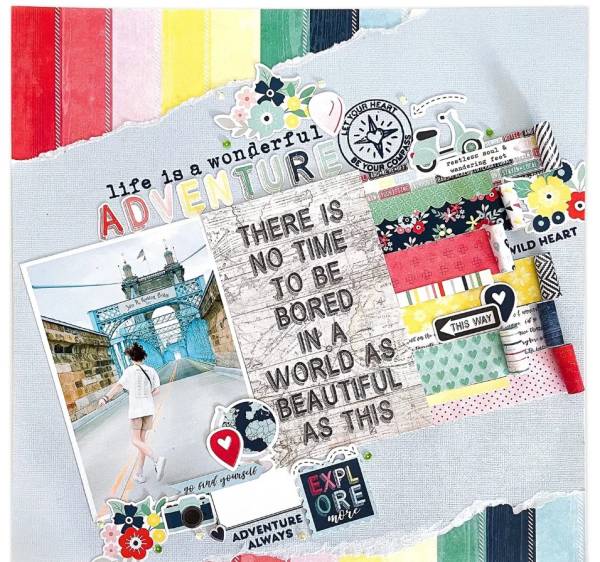
Instead of using scraps you can simply cut a large piece of paper into strips like Karlla did here. She cut it at an angle, stitched each strip down the middle and placed them over another piece of pattern paper using foam tape and spacing them a bit for wonderful depth. This design has lots of patterns but they still all work well together. Find all the details at the Simple Stories blog.
12 Unique Ways to Use Paper Strips on Scrapbook Layouts
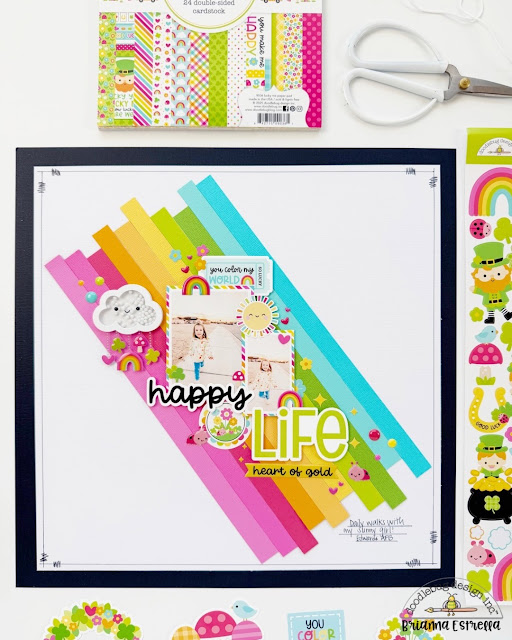
Brianna staggered strips of colorful paper to create a stripey rainbow for her layout background. There’s up lifting sentiments, a cloud shaker element and sweet little embellishment as well. I love the faux stitching she drew around the edges, it’s an easy way to get the look without a sewing machine! Find all the details at the Doodlebug blog.
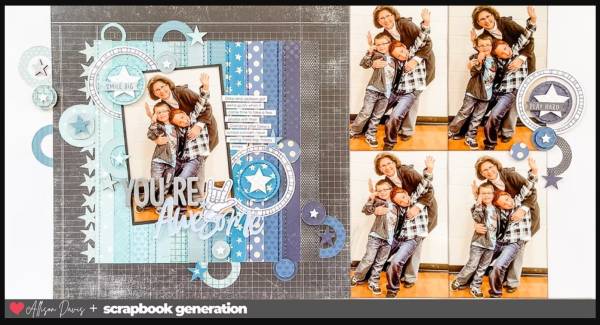
Allison created a block of monochromatic strips of pattern paper that go from pale blue to deep grey, that goes a little over the center of the two pages. She included stitching on the strips as well as cutting donuts and stars from the same papers and scattering them around for lots of movement. They are balanced by a grid of photos opposite. Learn more at the Allison Davis 4SG blog.

Upon first glance it appears as though Eva has woven the strips of colorful papers into her white background but it’s actually just strips and blocks spaced out. She focused all the “action” up top with the strips, photo, title, journaling and embellishments and then spread them out down at the bottom for such a unique look! Take a closer look at the Pinkfresh Studio blog.
12 Unique Ways to Use Paper Strips on Scrapbook Layouts
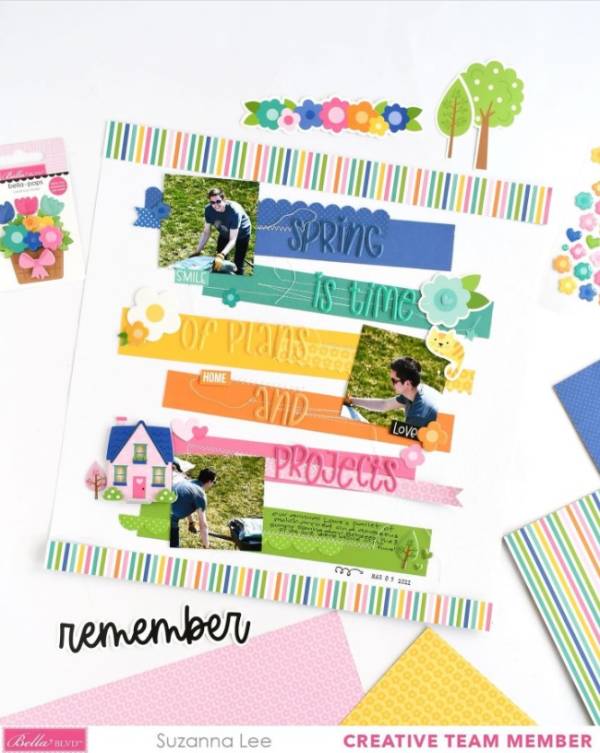
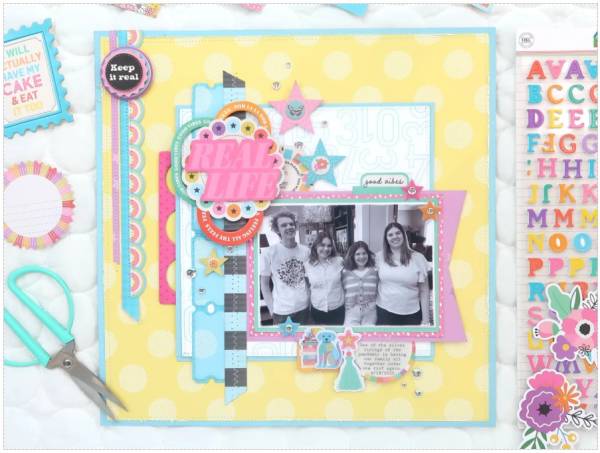
Suzanna layered several strips of papers, overlapping two of each color, to create her background. Each section has sewing, most make up a line of her title, created with sticker letters, another has journaling and the photos overlap them. Notice how she added matching colors of embellishments to each strip too. I came across her idea on the Bella Blvd. Instagram page.
Paige’s page is one of my favorite in todays post, using strips of pattern paper and accordion folding them which give great depth and texture to the design! There’s a wide area of the blue base paper showing around the edges to help balance the pattern and she used the same shade of blue letters for her title. Watch her process video at the Paige Taylor Evans blog.
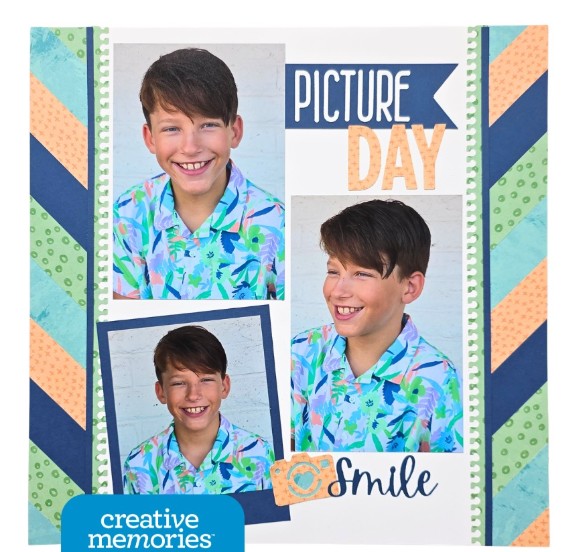
Meggan made her own Chevron background using paper strips placed at an angle down both sides of the layout. She added a wide section of layered paper in the center, placing the photos, die cut camera, words and title there. I love how she pulled colors from the shirt for the strips! She’s sharing a process video at her Meggan Jacks Scrapbooking blog.
Sometimes you might just have a few scraps of paper and that’s ok, they’ll still help create a cool and interesting accent. Jana used strip in different shapes, lengths and sizes on the left side to balance the photo, adding some pattern paper behind the phic, a 1/2 circle for journaling and lots of word and embellishments all in coordinating colors. Take a closer peek at the Jana Eubank blog.

And lastly here is another of my favorite ideas, these strips of pattern papers are double sided and were folded at different angles and adhered down a wide area of the page for a really fun design. The strips echo the colors in the photos that are themselves matted with brown paper with a pale blue background and a block with an envelope for journaling. Find all the details at the Creative Memories blog.
-Heather
